Upgrading the CPU in my trusty old laptop from an underpowered Core Duo T2300E CPU to a Core2 Duo T7200 was a fun experience. So, when I helped clean the fan blades and cooling vents in a friend’s Acer Extensa 4420, I could not help but suggest that we try upgrading the CPU, from a 1.9 Ghz Athlon 64X2 TK-57 to a 2.2 Ghz AMD Turion 64X2 TL-64. Not only does the latter CPU have a higher top clock speed, it also has twice the L2 cache per core.
This was the first time in my life I bought stuff on Ebay, and, it came through for me. I only used the “But it now” feature: I don’t care for the whole auction thing.
The CPU itself came from remic-smi at a very reasonable price. I was eager to replace the CPU and get on with other things, so I grabbed a screw-driver, and removed the back panel on the Extensa. The fan screws came of with no problem, and I pushed it aside. Then, it was time to remove the heat sink. I could feel the head stripping on the first screw I attacked, but, in that moment of folly, I pressed, and, predictably, only succeeded in making the hole rounder.
I tried a bunch of things, a rubber band, a smaller screw I found with some super glue, and even resorted to SteelStik. Did not work. I was too nervous to drill into the screw, given the chance that, in my hands, the bit could slip, and damage the motherboard.
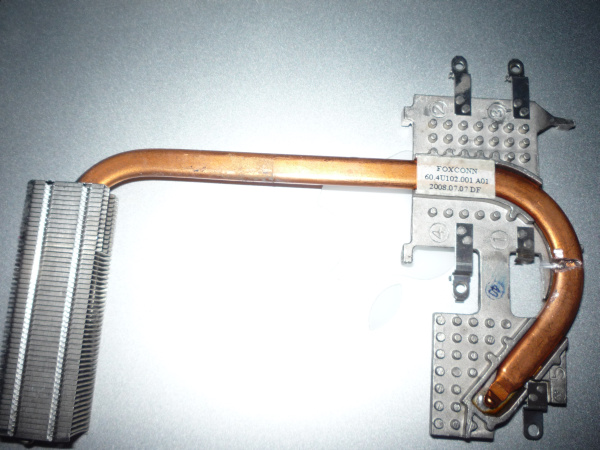
Ebay came to the rescue again. Specifically, fantomofthefair had a heat sink and a set of screws for a few bucks (including shipping). I ordered it, and put the cover back on. The CPU upgrade would have to wait for the new heat sink and the screws to arrive.
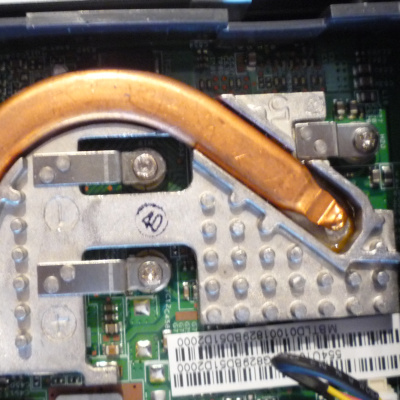
When the time came, I tried to cut off the bridge between the heat sink and the screw hole using pliers, scissors, a craft knife, and a bunch of other things. When nothing seemed to be working very fast, it was time for a rotary tool. Some sparks and a superfluous fire alarm later, here’s what I ended up with:
The screw was still on the motherboard, but now, it was trivial to loosen the entire assembly and remove everything by hand:
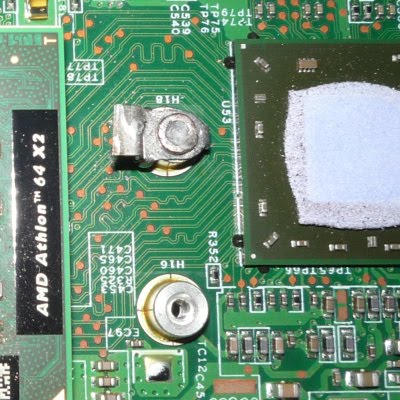
Incidentally, you can see the extra crud covering the screw, left over from my experiments with the various chemicals.
Next, as usual, I applied thermal compound to the CPU and the new heat sink after cleaning the surfaces with high purity alcohol and a coffee filter, and installed the new CPU. The first few times, I booted into memtest86+ using an ArchLinux install USB drive, and started running the test. First time, the CPU over-heated after a minute, next after 3-4 minutes, and then after about 10 minutes. I waited a few minutes between restarting after each shutdown. Once I got memtest86+ to run for more than an hour without the system shutting down, I turned the computer off, and re-installed the hard drive I had removed earlier (just in case — we did not care too much about the system itself, but the drive contents are important. And, no, I am not going to pretend that we made backups before this).
Then, it was time to boot into Windows Vista 32-bit SP2 (I know, the real WTF). It went without a hitch. We noticed that the fan was coming on much less often, probably because of the fresh thermal compound on meticulously cleaned surfaces (it also helps that the TL-64 uses lower voltage at comparable clock speeds). Open Hardware Monitor confirms that core temperatures fluctuate between 35°C to 48°C.
In the Windows Experience Index, the Processor score went from 4.7 to 4.9 (a 4.3% increase, much less than the 15.7% difference in the top speeds of the CPUs).
Interestingly, though, things do seem to be be running much more smoothly, and the Windows power meter is estimating about 20-30 minutes more run time using the Balanced plan. Regardless of the actual performance benefit (if there were any), it was a fun little project with a very low monetary cost, and it made an otherwise cold and dreary afternoon fun. Here is the CPU-z screenshot before the upgrade:

And, here is the screenshot after the upgrade (with Windows update and ffmpeg running in the background, so CPU speed is pushed to the max):

This was also the first time since the last century that I looked at Ebay, and decided to shop there. Along, the way, I also decided to order full sets of extra screws for my trusty old Lenovo (from discountedlaptopparts) and another set for this Extensa (from laptoprecover). Both orders cost just a few bucks, and came through without a hitch. Maybe I should look for a set for my MacBook Pro as well.
A note of caution: You may have noticed that I have a slightly cavalier attitude towards these circuit boards and associated hardware. That’s probably because I started taking things apart (and, usually, ended up breaking them) way back in the late 70s as a kid. Heck, I’ve never even seen a static strap, much less wear one. So, don’t try this stuff if rendering something unusable by mistake might be too costly ;-)